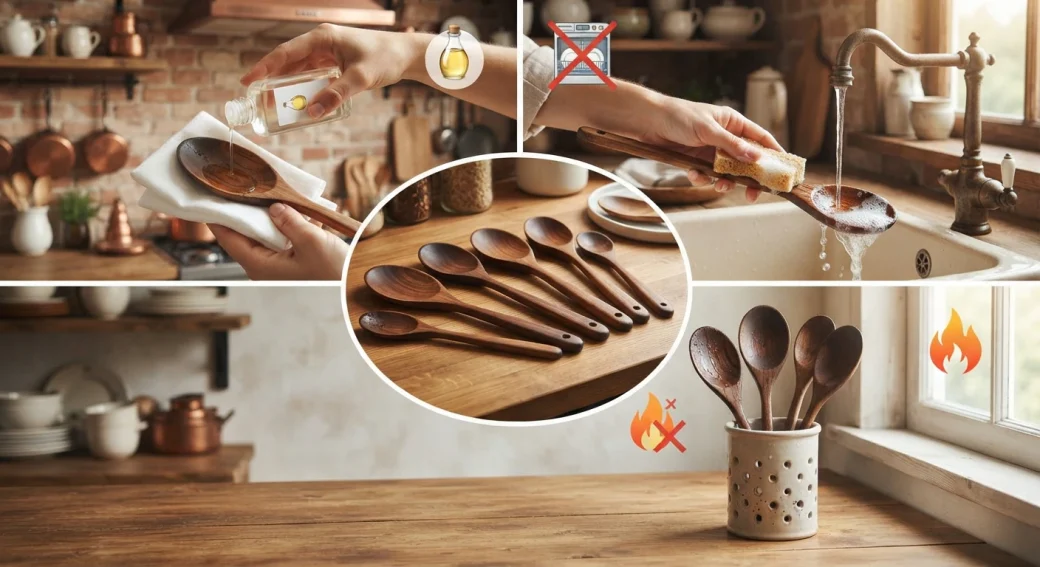
You buy a lovely wooden spoon, use it happily for a few months, and then one morning you spot a thin line running down the bowl. Knowing how to prevent wooden spoons from cracking saves you from that little letdown, and it takes far less effort than most people expect. A handful of habits around water, drying, oil and storage do nearly all of the work. Wood reacts to moisture, so most splits aren’t a manufacturing flaw. They’re the result of how a spoon is treated from one meal to the next. This guide covers why spoons split and what to do about it, step by step.
How to Prevent Wooden Spoons from Cracking
If you only have a minute, these seven habits are the best ways to prevent wooden cooking spoons from cracking. Each one is explained further down, with the reasoning behind it, so you can adjust the routine to suit your own kitchen.
- Wash by hand with warm water and a little mild soap, then rinse.
- Skip the dishwasher, the long soak and the boiling pot.
- Towel-dry right away, then let the spoon finish drying standing upright.
- Oil it with food-grade mineral oil whenever the wood looks pale or dry.
- Lift the spoon out of simmering food instead of leaving it in the pot.
- Store spoons somewhere dry, airy and away from heat.
- Sand rough patches early, and retire a spoon once it genuinely cracks.
Why Wooden Spoons Crack in the First Place
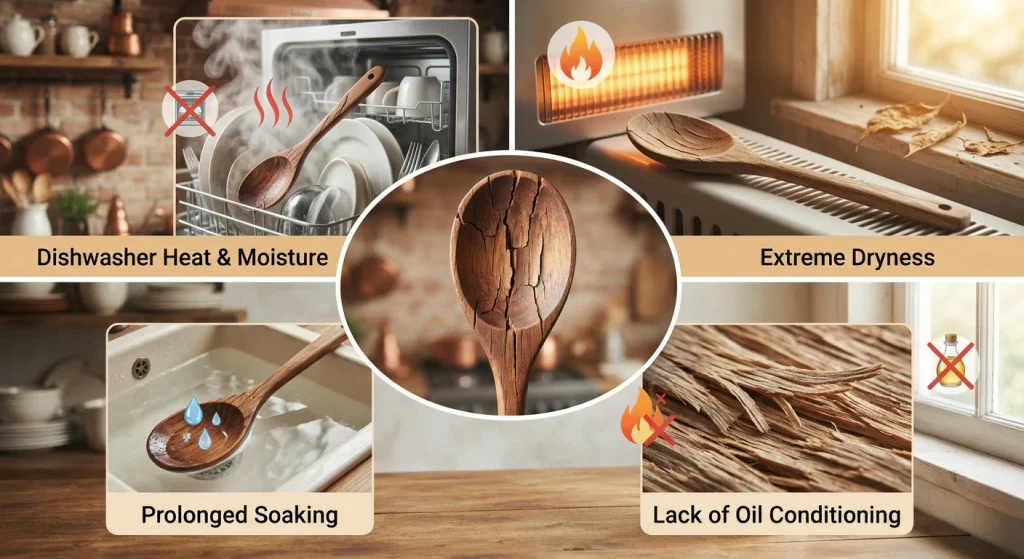
Cracks rarely come from one dramatic mistake. They build up over weeks and months of getting wet and drying out again, which slowly stresses the fibers until a seam finally gives way. Two things sit behind most splits: how wood handles moisture, and how rough or frayed the edges have become.
Moisture Moves In and Out of the Wood
Wood is hygroscopic, which simply means it takes on moisture from its surroundings and gives it back again. The USDA Forest Products Laboratory covers this in its chapter on moisture relations in the Wood Handbook, and the handbook describes how the resulting swelling and shrinking can lead to warping, checking and splitting. It isn’t even, either. Wood generally shrinks about twice as much along the growth rings as across them, so a spoon doesn’t just get smaller as it dries, it gets pulled slightly out of shape. Repeat that often enough and a crack becomes far more likely.
How much a spoon moves also depends on the species, which is one reason the wood you start with matters. If you’re still choosing, a comparison of popular spoon woods explains how the common options differ.
Frayed Edges and Rough Spots
The link between wood grain and cracking is easy to see on a new spoon. When it’s shaped, the cut ends of the grain are left a little rough, and those edges can fray once they get wet from cooking and washing. Frayed fibers collect stains and odors and let water slip deeper into the wood, which is how a small surface problem turns into a split. If a spoon holds on to stubborn garlic or curry smells, rough fibers can be one of the reasons, and that roughness is worth fixing before it spreads.
Wash Wooden Spoons Gently to Avoid Water Damage
Water is the biggest everyday risk, which makes your washing routine more important than any product you could buy. To prevent cracks in wooden cooking utensils, the goal is simple: get the spoon clean quickly, and never let it sit wet, soaked or overheated for longer than it has to.
How to Prevent Wooden Spoons from Cracking in Washing
Hand washing wooden spoons with warm water and a drop of mild dish soap is all most of them ever need. Rinse straight after cooking, before food dries on, and use a soft sponge instead of anything harsh. Stained or greasy spoons need a little extra attention, and a fuller step-by-step cleaning routine covers gentle options like baking soda and coarse salt.
Why Do Wooden Spoons Crack After Washing?
It’s usually not the washing itself but how long the wood stays wet and how quickly it dries afterward. The dishwasher is the worst case. Its hot, humid cycle makes wood expand, and the drying cycle shrinks it back, and after enough rounds that leads to warping, cracking and splitting. America’s Test Kitchen reported that just ten trips through the dishwasher left spoons looking bleached and dry.
Should You Boil or Soak Wooden Spoons?
No to both. Boiling is a popular internet shortcut for deep cleaning, but it draws natural oils out of the wood and weakens it, and a long soak lets water seep deep into the grain, where it can stay trapped. When you want a spoon properly sanitized, there are gentler ways to disinfect it without soaking that don’t put the wood through that stress.
How to Prevent Wooden Spoons from Cracking in Water
Water exposure isn’t only about the sink. A spoon left in a basin of dirty dishes, a soggy dish rack or a simmering pot is sitting in moisture far longer than you meant it to. Lift the spoon out of the pot between stirs, rest it on a plate or spoon rest, and wash it soon after the meal so the wood isn’t damp for hours.
Dry Wooden Spoons Properly After Every Wash
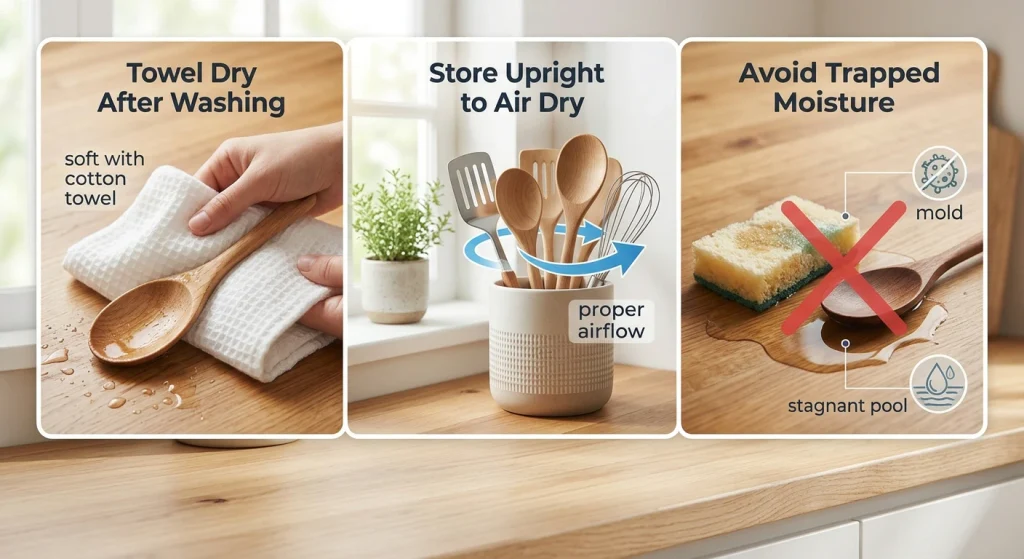
Drying is where good intentions often fall apart. The best wooden spoon drying techniques share one idea: a spoon should lose its surface water quickly, but without sudden heat, so the whole piece dries evenly instead of just the outside.
Towel First, Then Air
Pat the spoon dry with a clean towel straight after washing, including the handle and the underside of the bowl. Don’t leave it to air dry flat in the sink, because water can keep creeping into the wood. Once the surface water is gone, let the spoon finish drying somewhere with decent airflow.
How to Prevent Wooden Spoons from Cracking While They Dry
The aim is gentle, even drying. Keep spoons away from stoves, ovens and other heat sources, since heat can warp and crack them, and don’t rush the process with direct heat. The Wood Handbook also points out that the rate of drying can affect how much some species shrink, which is a good reason to let things happen at room temperature.
Stand Spoons Upright
Standing spoons up instead of laying them flat gives air access to every side, which helps the wood dry evenly and stops it expanding and cracking. A simple jar or crock on the counter works well, as long as the spoons are completely dry before they go in and it isn’t parked right beside the burner.
How to Oil Wooden Spoons Without Making a Mess
Should you oil wooden spoons at all? In most cases, yes. A little oil slows moisture loss in wooden spoons, so the wood is less likely to dry out, turn brittle and split. It’s how to protect wooden spoons from drying out, and it keeps wooden spoons from drying and splitting between washes. Think of it as conditioning wooden cooking utensils the same way you’d moisturize skin: a quick job done now and then, with a noticeable payoff over time.
What Oil to Use on Wooden Utensils
The oil you choose matters, because food touches the wood afterward. Skip furniture oils and anything not sold for food contact, and stick to products made for kitchen woodenware. The two sections below cover the best pick and the ones to avoid.
Best Oil for Preventing Wooden Spoons from Cracking
Food-grade mineral oil is the most commonly recommended choice. It’s tasteless, odorless and doesn’t go rancid. FDA regulations cover white mineral oil for food use (21 CFR 172.878), and many products list that standard on the label, so look for “food grade” or “USP” rather than a bottle sold for industrial or woodworking use. Food-safe mineral oil for wooden utensils is easy to find in the cutting-board care aisle. A mineral oil and beeswax blend works well too: the oil soaks in, and the beeswax adds a thin layer that repels water.
Oils to Skip
Common cooking oils such as olive, vegetable, canola and sunflower can go rancid once they’ve soaked into wood, leaving a sticky film and an unpleasant smell. Advice on coconut oil is mixed: some care guides recommend it, others warn against it. If you want the lowest-risk option, food-grade mineral oil is the safer bet.
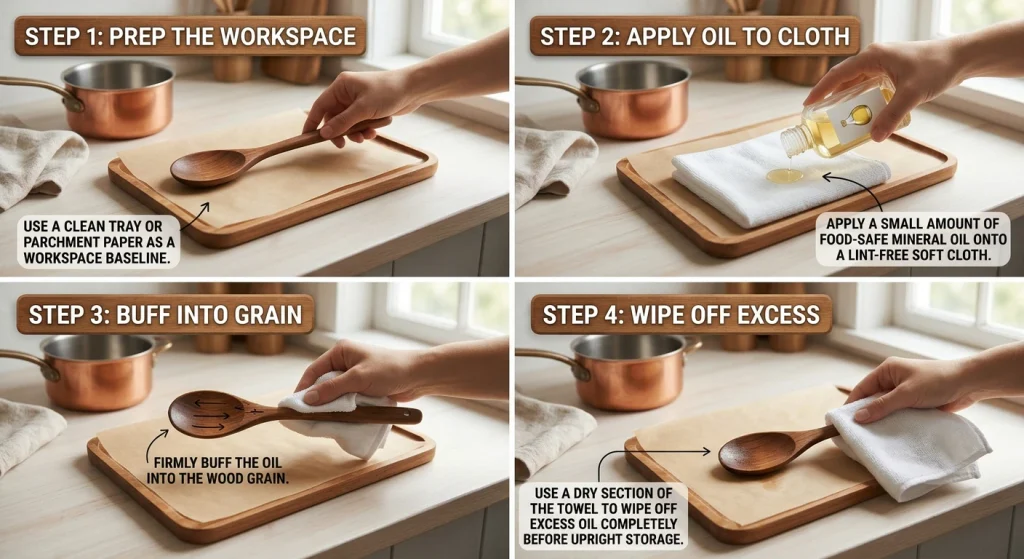
Step-by-Step Oiling for Wooden Spoons
Here’s a simple routine for how to oil wooden utensils of all kinds, from spoons to ladles and spatulas. It takes a few minutes of actual effort, and most of the time is just waiting for the oil to soak in.
- Start with a clean spoon that is completely dry.
- Rub a small amount of food-grade mineral oil over the whole spoon with a soft cloth, covering the handle, the edges and the inside of the bowl.
- Let it soak in. Some product labels suggest around 20 minutes for utensils, while some care guides leave spoons overnight.
- Wipe off any excess with a clean cloth so the spoon doesn’t feel sticky.
How Often Should You Oil Wooden Spoons?
Advice ranges from every few weeks to every few months, and there’s no single correct schedule. A better guide is the wood itself: pale, dull or slightly rough wood is thirsty. As a rule of thumb, spoons you use and wash daily may want oil roughly once a month, while spoons you use less often can wait longer.
How to Condition Wooden Spoons Naturally
If you’d rather avoid mineral oil, a beeswax-based conditioner is the other option care guides commonly mention, and you can also buy or mix a blend of beeswax and mineral oil. This is also the answer to a common question: what can you use to seal a wooden spoon? Oil and beeswax don’t make wood waterproof, but they slow water absorption enough to make a real difference.
Cooking and Storage Habits That Protect the Wood
Even a well-oiled spoon can split if it’s used for the wrong job or stored in a damp drawer. A few small habits help prevent wooden utensils from splitting, and they’re easy to build in once and then forget about.
Match the Spoon to the Heat
Wooden spoons are at their best for stirring sauces, soups and gently simmering dishes. For high-heat cooking, silicone or metal tools handle intense temperatures better, which saves your wooden spoons from drying out and getting damaged. Scraping hard at the base of a pan can also wear the edges down over time and cause fraying.
Store Wooden Utensils Properly
Proper wooden utensil storage comes down to three words: dry, airy and away from heat. Keep spoons away from heat sources, and avoid damp drawers or a wet dish rack, where wood holds onto moisture and invites mold and bacteria. A dry, well-ventilated spot keeps the wood stable between uses.
When to Repair, Resand or Retire a Spoon
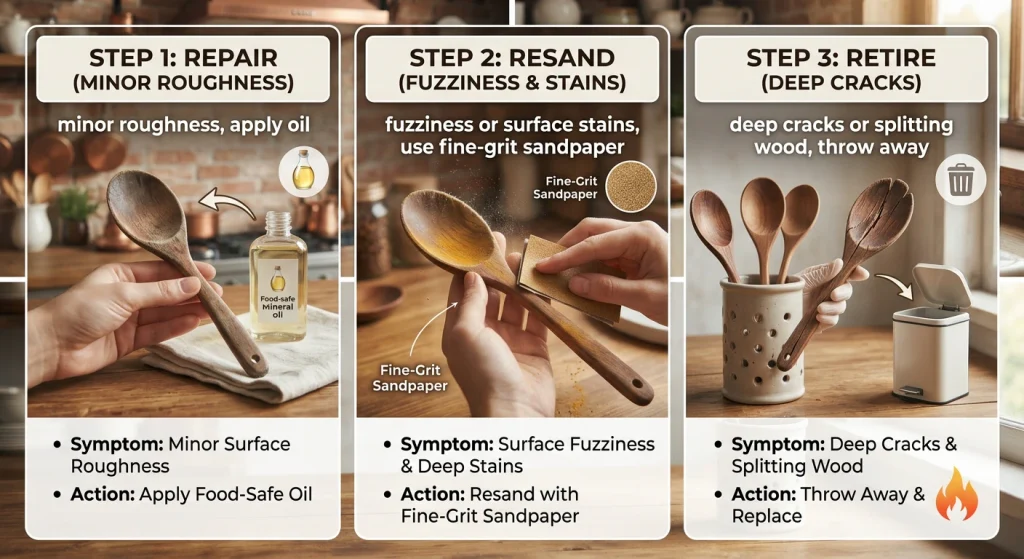
Even careful cooks end up with a worn spoon eventually. Keeping wooden spoons in good condition means telling the difference between a rough patch you can fix and a crack you can’t.
Sanding Rough or Fuzzy Wood
If a spoon feels coarse or fuzzy, sand it lightly with fine-grit sandpaper, wash it with soap and water, let it dry completely, and then soak it in mineral oil for around 15 to 20 minutes. Catching this early stops fraying from becoming a split, and it brings back a smooth, comfortable finish.
When a Crack Means It’s Time to Replace the Spoon
Visible cracks, fuzzy raised grain, mold, or smells that hang around after cleaning and drying are all signs it’s time to retire a spoon. Cracks trap food particles and bacteria, and even a paper-thin hairline crack at the business end is reason enough to replace it. If you’re unsure about a damaged spoon, read more about how safe wooden spoons are for everyday cooking before you decide.
Can You Glue a Cracked Wooden Spoon?
It’s not worth it. Food-safe wood glue is sometimes used for hairline cracks in cutting boards, but for a spoon the standard advice is to replace it. Old spoons don’t have to go in the bin, though: they make handy garden markers, and they’re fine for craft projects.
Frequently Asked Questions
These are the questions people ask most often about spoon splitting and care. Each answer is kept short and direct so you can skim straight to the one you need and get back to cooking.
Why Are My Wooden Spoons Cracking?
Most often it’s repeated cycles of getting wet and drying out. Dishwashers, long soaks, boiling and heat all push the wood to swell and shrink, and dry, unoiled wood becomes brittle and splits more easily. Rough, frayed edges also let water in, so cracks often begin there.
What Should I Oil My Wooden Spoons With?
Food-grade mineral oil is the usual recommendation because it doesn’t go rancid, and a mineral oil and beeswax blend is a good alternative. Avoid cooking oils like olive and vegetable oil, which can turn rancid and leave a sticky, smelly film on the wood.
How Long Do Wooden Spoons Typically Last?
There’s no fixed lifespan. With regular hand washing, proper drying and occasional oiling, some care guides suggest five years or longer, and a well-loved spoon can last decades. Once a spoon shows cracks, mold or lingering odors, replace it regardless of its age.
What Can I Use to Seal a Wooden Spoon?
Food-grade mineral oil, or a mix of mineral oil and beeswax, is the simplest way to seal a wooden spoon. It won’t make the wood waterproof, but it slows water absorption. Reapply when the surface looks dull or dry, and wipe off the excess after each coat.
Final Thoughts
That’s really all there is to caring for wooden spoons to avoid cracking: wash quickly by hand, dry them straight away, give them a little food-grade oil when they look thirsty, and store them somewhere dry and airy. None of it is hard, and it can add years to a spoon you actually like using. For the wider picture, from choosing to cooking and caring, take a look at a broader overview of cooking with wooden tools. And if a spoon does crack, don’t take the risk. Swap it for a new one and start the habits fresh.

[…] on how often, from every few weeks to a couple of times a year. For a deeper walk-through on stopping splits before they start, see our dedicated […]
[…] reach. Let each wooden kitchen tool dry fully before you stand it in a holder. If you want to stop wooden tools from splitting, good drying habits make a big difference, and you can read about washing wooden spoons and […]
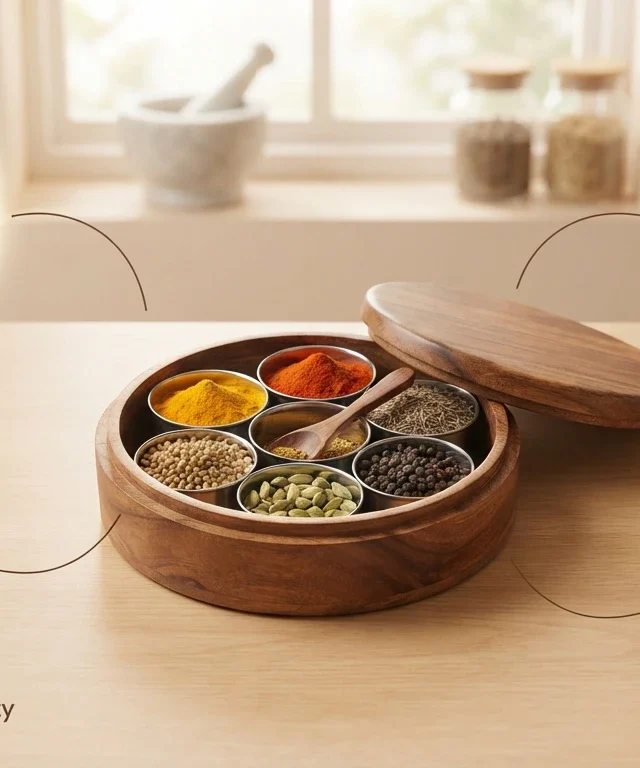
[…] inner lid, or a steel cup inside the wooden box, solves most of this. You can also learn how to keep wood from splitting with a few simple habits that work for any wooden item in your […]